
Part 4 of the Agentic AI Design Patterns series. Part 1 covered tool-using agents, Part 2 the ReAct loop, Part 3 router agents. This post is about the most fundamental pattern of all getting agents to work in a reliable, step-by-step line.
All the code in this article is on GitHub, ready to clone and run: Github
Why Sequential Workflows?
Ask a single LLM call to “research this topic, write a 2,000-word article, fact-check it, and optimize it for SEO,” and you’ll get a mediocre result at every one of those jobs. Not because the model can’t do them but because you asked it to do everything at once, in one shot, with no chance to get each part right before moving on.
Now think about how a human content team does it. A researcher gathers material. A writer turns it into a draft. An editor polishes it. Each person does one job well, hands their work to the next, and the quality compounds. Nobody tries to do all four jobs simultaneously in their head.
That’s a sequential workflow, and it’s the simplest, most reliable way to get complex work out of AI agents. You break a big task into ordered steps, give each step a focused job, and pass the output of one step as the input to the next. The result is more accurate (each step is small enough to get right), more debuggable (you can see exactly which step failed), and more controllable (you decide the order) than one giant do-everything prompt.
It’s also the pattern you’ll reach for most often in real systems. Routers (Part 3) decide where work goes; sequential workflows decide in what order work gets done. Let’s build them.
What Is a Sequential Agentic Workflow?
A sequential agentic workflow is a pipeline of steps that run in a fixed, predetermined order, where each step’s output becomes the next step’s input.
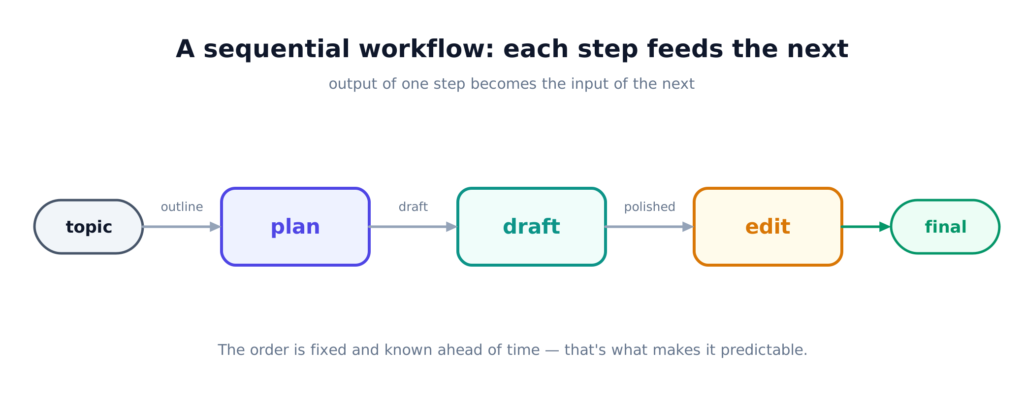
The defining words are fixed order. Unlike a router (which decides where to go) or a ReAct agent (which decides its next move in a loop), a sequential workflow’s path is known before you run it. Step 1, then step 2, then step 3. Every time.
We’ll use one running example throughout: a blog-post pipeline with three steps.
- plan — take a topic, produce an outline
- draft — take the outline, write a draft
- edit — take the draft, polish it into the final post
Topic goes in one end, a finished post comes out the other, and each step builds on the last. Simple to picture, and as you’ll see simple to build well.
How Sequential Workflows Work
Three ideas make a sequential workflow tick:
- Steps run in order. The sequence is fixed and defined by you, not decided at runtime by a model.
- Output flows to input. Each step consumes what the previous step produced. The outline feeds the writer; the draft feeds the editor.
- Shared state carries the data. As the work moves down the line, a shared “state” object accumulates everything produced so far, so any step can read what earlier steps wrote.
That third point is the heart of it, and we’ll spend a whole section (9) on it. For now, hold this picture: a container that starts with just the topic and ends full topic, outline, draft, final with each step adding its piece as the container passes through.
The beauty is the predictability. Because you control the order, you can reason about exactly what happens, test each step in isolation, and know precisely where things went wrong when they do.
Sequential Workflows vs. Simple LLM Chains
If you’ve used LangChain before, you might think “isn’t this just a chain?” Close, but there’s a meaningful difference worth being clear about.
A simple LLM chain is usually a straight pipe: prompt → model → output → next prompt → model → output. It’s a sequence of model calls wired together, and it typically passes along a single blob of text.
A sequential agentic workflow is richer in three ways:
- Steps can be full agents, not just prompts — each can have its own tools, its own system prompt, its own reasoning loop (the ReAct loop from Part 2).
- It carries structured state, not just a text blob — multiple named fields (topic, outline, draft…) that any step can read or write.
- It can branch and loop — validation gates, retries, and conditional paths, not just a straight line.
In other words, a chain is the simplest special case of a sequential workflow. When your steps are just prompts and the data is just text, a chain is fine. The moment you want focused agents, structured data passing between them, or quality gates between steps, you want a proper workflow which is exactly what LangGraph gives you.
Sequential Workflow Architecture
Here’s the shape we’re building toward:
  topic ─► [ plan ] ─► [ draft ] ─► [ edit ] ─► final
             │            │            │
             └──── all read/write the shared STATE ────┘
The components:
- Steps (nodes) — each does one focused job.
- Edges — the fixed connections that define the order.
- State — the shared object every step reads from and writes to.
- (Later) gates and retries — validation between steps and recovery when a step fails.
We’ll start with the barest version in plain Python, then rebuild it in LangGraph, then add the production pieces (state, validation, error handling) one at a time.
Building a Basic Sequential Workflow with Python
No framework needed to understand the core idea. It’s just functions, called in order, each passing its result to the next.
from langchain.chat_models import init_chat_model

llm = init_chat_model("openai:gpt-4o-mini")

def plan(topic: str) -> str:
    return llm.invoke(f"Write a 4-bullet outline for a post about: {topic}").content

def draft(outline: str) -> str:
    return llm.invoke(f"Write a 150-word draft following this outline:\n{outline}").content

def edit(draft_text: str) -> str:
    return llm.invoke(f"Tighten and polish this draft:\n{draft_text}").content

def run(topic: str) -> str:
    outline = plan(topic)          # step 1's output
    draft_text = draft(outline)    # becomes step 2's input
    final = edit(draft_text)       # becomes step 3's input
    return final

print(run("why small AI agents beat one giant agent"))
That’s a complete sequential workflow. Read the run function the entire pattern is in those three lines: plan → draft → edit, each receiving what the last returned. Everything else in this article is about making this same flow more capable and more robust.
This plain version is genuinely fine for simple cases. You’d outgrow it when you want each step to be a real agent, when you need to pass more than one piece of data between steps, or when you need validation and error handling — which is where the rest of the article goes.
Adding Multiple AI Agents to the Workflow
The next step up: make each stage a focused agent with its own role, instead of a bare prompt. This is where “sequential workflow” earns the “agentic” label.
from langchain.agents import create_agent

MODEL = "openai:gpt-4o-mini"

planner = create_agent(model=MODEL, tools=[],
    system_prompt="You are a content planner. Output a tight 4-point outline, nothing else.")
writer = create_agent(model=MODEL, tools=[],
    system_prompt="You are a writer. Turn the given outline into a ~150-word draft.")
editor = create_agent(model=MODEL, tools=[],
    system_prompt="You are an editor. Tighten the given draft; fix flow and clarity.")

def ask(agent, text: str) -> str:
    result = agent.invoke({"messages": [{"role": "user", "content": text}]})
    return result["messages"][-1].content

def run(topic: str) -> str:
    outline = ask(planner, f"Topic: {topic}")
    draft = ask(writer, outline)
    return ask(editor, draft)
Each agent has a sharp, single-purpose system prompt, which makes it better at its one job than a generalist juggling all three. And because they’re real agents, any of them could be given tools the planner could search the web, the editor could call a readability checker without changing the shape of the pipeline. The handoff stays dead simple: one agent’s output is the next’s input.
Building a Sequential Workflow with LangGraph
Plain functions work, but once you add state, validation, and error handling, you want a framework that models the pipeline as a graph. In LangGraph, each step is a node and the order is defined by edges.
from typing import TypedDict
from langgraph.graph import StateGraph, START, END
from langchain.chat_models import init_chat_model

llm = init_chat_model("openai:gpt-4o-mini")

class State(TypedDict):
    topic: str
    outline: str
    draft: str
    final: str

def plan_node(state: State) -> dict:
    return {"outline": llm.invoke(f"Outline a post about: {state['topic']}").content}

def draft_node(state: State) -> dict:
    return {"draft": llm.invoke(f"Draft from this outline:\n{state['outline']}").content}

def edit_node(state: State) -> dict:
    return {"final": llm.invoke(f"Polish this draft:\n{state['draft']}").content}

builder = StateGraph(State)
builder.add_node("plan", plan_node)
builder.add_node("draft", draft_node)
builder.add_node("edit", edit_node)

builder.add_edge(START, "plan")     # the fixed order,
builder.add_edge("plan", "draft")   # one edge
builder.add_edge("draft", "edit")   # per hop
builder.add_edge("edit", END)

graph = builder.compile()

result = graph.invoke({"topic": "why state matters in agentic workflows"})
print(result["final"])
The add_edge calls are the sequence — START → plan → draft → edit → END, a straight line. Each node returns a small dict that updates the shared state. Why bother with a graph for something this linear? Because once it’s a graph, adding a validation gate or a retry loop is just adding a node and an edge as we’ll see in sections 11 and 12. The structure scales; the plain-functions version doesn’t.
Passing State Between Agents
State is the real star of a sequential workflow, so let’s slow down on it.
In LangGraph, state is a shared object (a TypedDict) that flows through every node. Each node receives the current state, does its job, and returns a partial update just the fields it changed. LangGraph merges that update into the state and passes the whole thing to the next node.
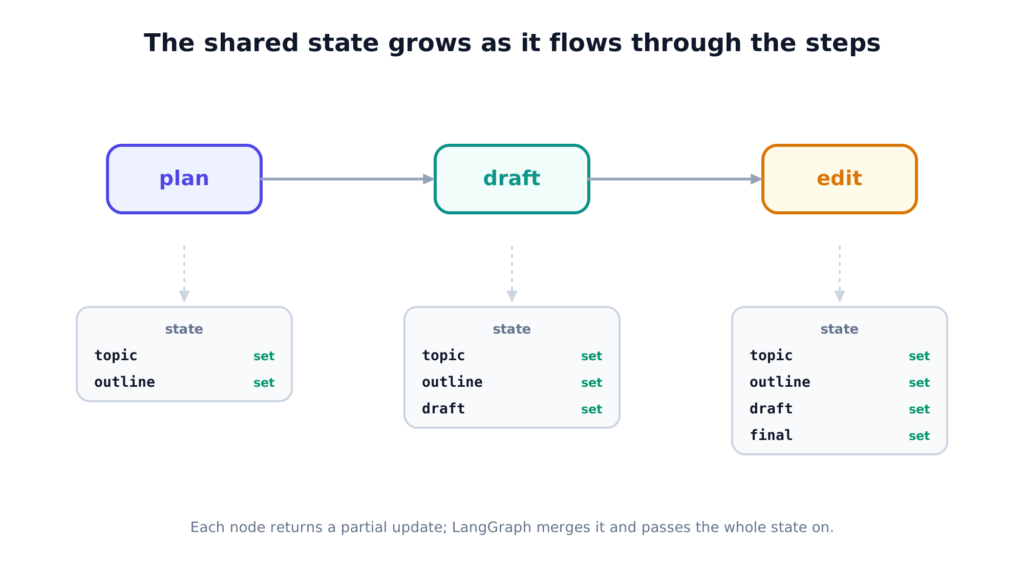
Watch it accumulate:
class State(TypedDict):
    topic: str      # set at the start
    outline: str    # added by plan_node
    draft: str      # added by draft_node
    final: str      # added by edit_node

def draft_node(state: State) -> dict:
    # it can read ANYTHING earlier steps wrote...
    outline = state["outline"]
    draft = llm.invoke(f"Draft from:\n{outline}").content
    # ...and returns only what IT changed
    return {"draft": draft}
Two things to internalize:
- A node returns only what it changes, not the whole state. LangGraph handles the merge. You never manually thread the full object from step to step.
- State is the memory of the workflow. It’s how the editor can see the original topic, not just the draft it was handed. Everything produced so far is available to every later step.
This is the mechanism plain, deterministic behind every pipeline in this article. (The companion repo has an example that prints the state at each step so you can literally watch it grow, and it runs with no API key.)
Building a Real-World Sequential Agentic System
Let’s make it realistic. A production content pipeline wants a structured outline (not loose text), a proper draft, and a polish step that also produces an SEO meta description.
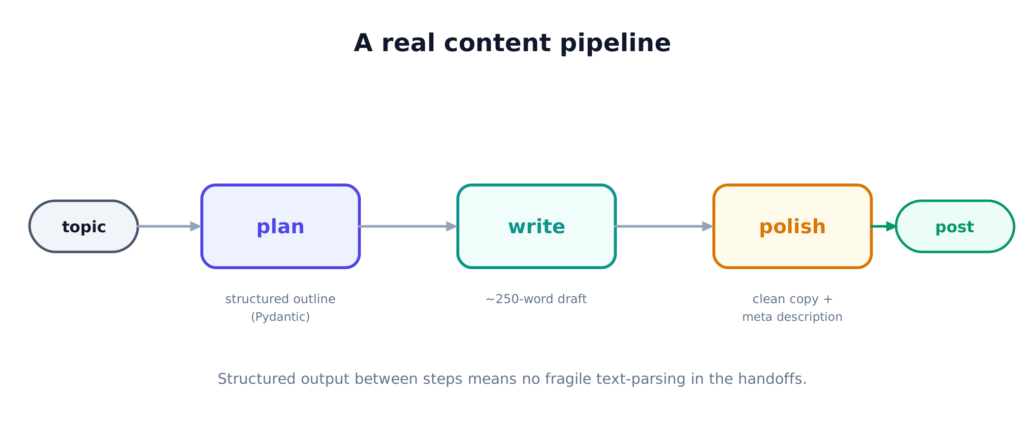
We use Pydantic for the outline so the handoff between steps is a validated object, not text we have to parse:
from typing import TypedDict, List
from pydantic import BaseModel, Field
from langgraph.graph import StateGraph, START, END
from langchain.chat_models import init_chat_model

class Outline(BaseModel):
    title: str = Field(description="A clear, engaging title.")
    sections: List[str] = Field(description="3-5 short section headings, in order.")

llm = init_chat_model("openai:gpt-4o-mini")
planner_llm = llm.with_structured_output(Outline)   # returns a validated Outline

class State(TypedDict):
    topic: str
    outline: Outline
    draft: str
    final: str
    meta_description: str

def plan_node(state: State) -> dict:
    return {"outline": planner_llm.invoke(f"Outline a post on: {state['topic']}")}

def write_node(state: State) -> dict:
    o = state["outline"]
    sections = "\n".join(f"- {s}" for s in o.sections)
    draft = llm.invoke(f"Write a ~250-word post '{o.title}' covering:\n{sections}").content
    return {"draft": draft}

def polish_node(state: State) -> dict:
    final = llm.invoke(f"Polish for clarity:\n{state['draft']}").content
    meta = llm.invoke(f"Write an SEO meta description (<160 chars) for:\n{final}").content
    return {"final": final, "meta_description": meta}

# ... wire START -> plan -> write -> polish -> END as before
The upgrade over section 8 is the structured handoff. The planner returns an Outline object with a typed title and sections list so write_node can loop over outline.sections with confidence, instead of trying to parse headings out of a text blob. Structured output between steps is what makes a multi-step pipeline robust; it’s the single most valuable habit when steps feed each other.
Handling Errors, Retries, and Failures
Here’s the catch with sequential workflows: one broken step breaks the whole chain. If the draft step throws, the edit step never runs. So every step that can realistically fail an API timeout, a rate limit, a malformed response needs a recovery plan.
The two tools are retries (try again, usually with exponential backoff) and fallbacks (a safe default when retries are exhausted):
import time

def with_retry(fn, *args, max_attempts=4, base_delay=0.2):
    for attempt in range(1, max_attempts + 1):
        try:
            return fn(*args)
        except Exception as exc:
            if attempt == max_attempts:
                raise                       # out of retries -> let caller handle it
            wait = base_delay * (2 ** (attempt - 1))   # 0.2s, 0.4s, 0.8s...
            print(f"attempt {attempt} failed ({exc}); retrying in {wait:.2f}s")
            time.sleep(wait)

def draft_node(state):
    try:
        return {"draft": with_retry(call_model, state["outline"])}
    except Exception as exc:
        # retries exhausted -> record the error and degrade gracefully
        return {"draft": "", "error": str(exc)}
Two principles that save you in production:
- Retry transient failures with backoff. Timeouts and rate limits are usually temporary; waiting a moment and retrying fixes most of them. Exponential backoff (0.2s, 0.4s, 0.8s…) avoids hammering a struggling service.
- Degrade gracefully when retries fail. Don’t let one dead step crash the entire pipeline. Record the error in state, return a safe placeholder, and let downstream steps decide what to do. A partial result with a clear error beats a stack trace.
(The repo has a runnable version with a simulated flaky step no API key needed so you can watch the retries and backoff happen.)
Adding Validation Between Steps
Retries handle steps that crash. But what about steps that “succeed” and produce bad output? A draft that’s off-topic, too short, or low quality shouldn’t silently flow downstream. The fix is a validation gate between steps.
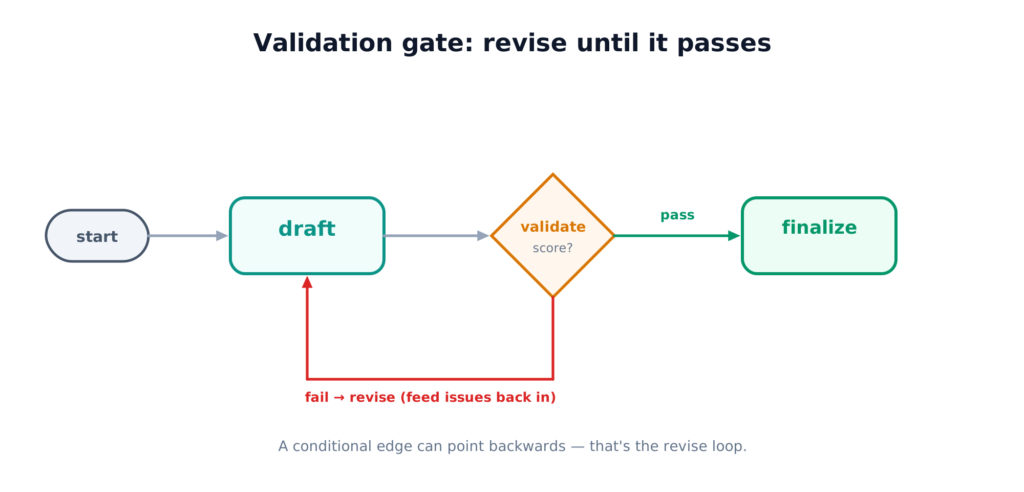
The pattern: after a step, run a validator. If it passes, continue. If it fails, loop back and redo the step feeding the problems back in so the retry is actually better. This is a conditional edge that points backwards, which LangGraph handles cleanly:
MAX_ATTEMPTS, QUALITY_BAR = 3, 0.8

def validate_node(state):
    # a real validator uses an LLM with structured output to score the draft
    return {"score": score_draft(state["draft"])}

def gate(state) -> str:
    if state["score"] >= QUALITY_BAR:
        return "finalize"                 # good enough -> move on
    if state["attempts"] >= MAX_ATTEMPTS:
        return "finalize"                 # out of tries -> ship best effort
    return "draft"                        # not good enough -> revise

builder.add_conditional_edges("validate", gate, {"draft": "draft", "finalize": "finalize"})
Two guardrails matter here. First, always cap the loop (MAX_ATTEMPTS) without it, a draft that never clears the bar loops forever and burns your budget. Second, feed the validator’s specific complaints back into the revise step (“too short,” “missed section 2”) so each attempt improves instead of randomly re-rolling. A validation gate with good feedback is what turns a flaky pipeline into a dependable one. (Runnable, no-key demo in the repo.)
For the validator itself, use structured output — a small Pydantic verdict:
class QualityCheck(BaseModel):
    passed: bool
    score: float = Field(ge=0.0, le=1.0)
    issues: List[str] = Field(default_factory=list)   # the feedback to feed back in
Parallel vs. Sequential Agentic Workflows
Sequential is right when steps depend on each other you can’t edit a draft before it’s written. But forcing independent steps into a line just wastes time. When steps don’t depend on each other, run them in parallel.
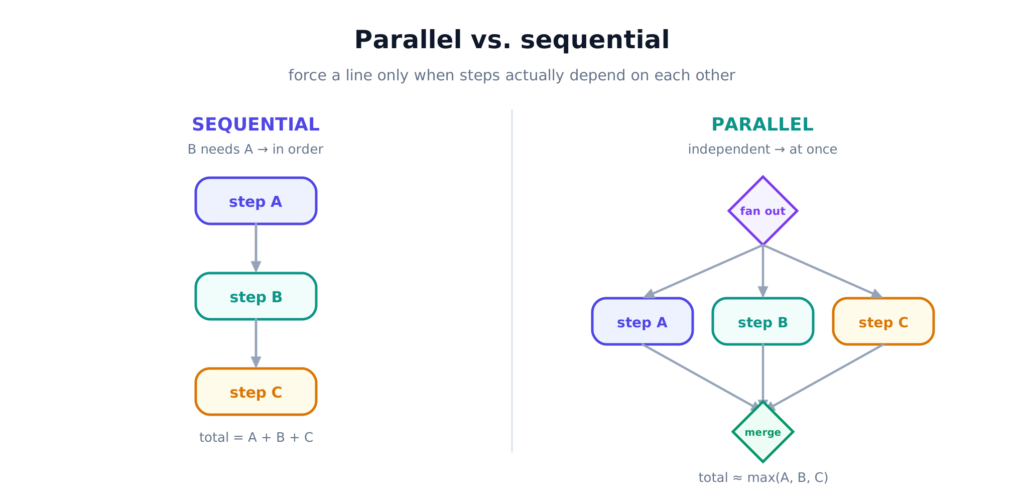
Say you want to analyze a piece of text three ways summary, sentiment, keywords. None needs the others, so running them in sequence is three times slower than it has to be. In LangGraph, parallel just means multiple edges out of one point. To safely merge results that several branches write at once, you give the shared field a reducer:
import operator, time
from typing import TypedDict, Annotated
from langgraph.graph import StateGraph, START, END

class State(TypedDict):
    text: str
    findings: Annotated[list, operator.add]   # reducer: concurrent appends merge safely

def summarize(state): time.sleep(0.3); return {"findings": ["summary: ..."]}
def sentiment(state): time.sleep(0.3); return {"findings": ["sentiment: positive"]}
def keywords(state):  time.sleep(0.3); return {"findings": ["keywords: ..."]}
def combine(state):   return {}

b = StateGraph(State)
for name, fn in [("summarize", summarize), ("sentiment", sentiment), ("keywords", keywords)]:
    b.add_node(name, fn)
b.add_node("combine", combine)
for name in ("summarize", "sentiment", "keywords"):
    b.add_edge(START, name)      # fan out: all three start at once
    b.add_edge(name, "combine")  # fan in: all three feed combine
b.add_edge("combine", END)
Run that and the three 0.3s steps finish in ~0.3s total, not 0.9s they overlapped. The Annotated[list, operator.add] is the key detail: without a reducer, two branches writing the same field at once would conflict; the reducer tells LangGraph how to merge them (here, concatenate the lists).
The decision rule is simple: sequential when later steps need earlier outputs; parallel when steps are independent. Real pipelines mix both fan out for the independent parts, stay in line for the dependent ones.
Sequential Workflow vs. Router and Supervisor Patterns
It’s worth placing this pattern next to the others in the series, because they solve different problems and people mix them up.
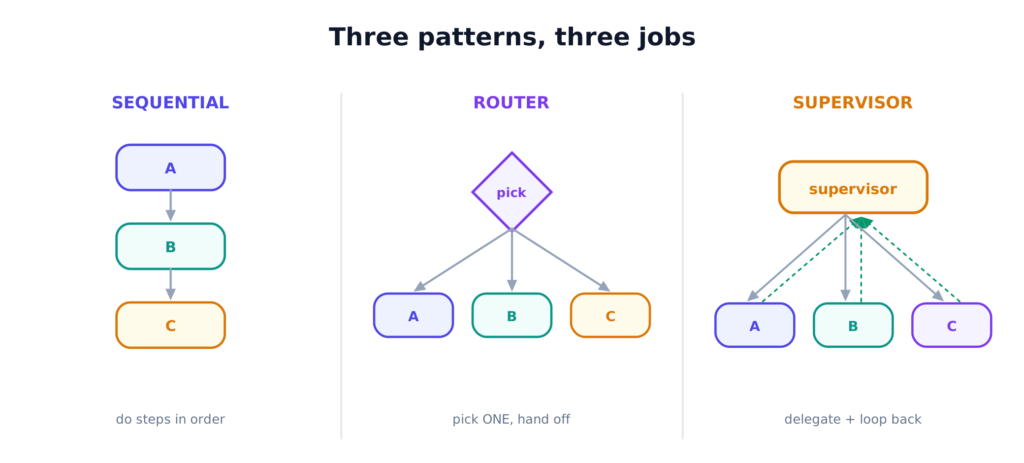
- Sequential workflow — runs steps in a fixed order, each feeding the next. Use it when a task has clear stages that must happen in sequence. “Plan, then write, then edit.”
- Router (Part 3) — makes one decision about which single handler should take a query, then hands off. Use it when different queries need different specialists. “Is this a weather or a math question?”
- Supervisor — a controller that delegates to agents, gets results back, and decides what to do next, possibly looping. Use it when coordination is dynamic and you don’t know the steps ahead of time. “Keep assigning work until the goal is met.”
The clean way to think about it: a sequential workflow’s path is fixed (you know the order up front), a router’s path is one branch chosen once, and a supervisor’s path is decided dynamically as it goes. They compose, too a supervisor might delegate to an agent that internally runs a sequential pipeline. Start with the simplest one that fits; reach for a supervisor only when the order genuinely can’t be known in advance.
Evaluating Sequential Agentic Workflows
A multi-step pipeline gives you two things to measure, and you want both:
- Per-step quality — is each step doing its job? If the final post is bad, is it because the outline was weak, or the writing, or the editing? Because the pipeline is modular, you can test each step in isolation with its own inputs.
- End-to-end quality — does the final output meet the bar? Run the whole pipeline on a set of test topics and grade the results.
For the end-to-end grade, the same trick from the router article works: use an LLM as a judge, with structured output so the verdict is clean.
class QualityCheck(BaseModel):
    passed: bool
    score: float = Field(ge=0.0, le=1.0)
    issues: List[str] = Field(default_factory=list)

judge = llm.with_structured_output(QualityCheck)

def grade(topic, post):
    return judge.invoke(f"Score this post on clarity and structure.\nTopic: {topic}\n\n{post}")

TOPICS = ["why routing beats one giant agent", "how to add memory to an agent", ...]
scores = [grade(t, run_pipeline(t)).score for t in TOPICS]
print(f"Average quality: {sum(scores)/len(scores):.2f}")
The habit that pays off: when the final output is bad, trace it to the step that caused it. That’s the whole advantage of a pipeline over one giant prompt the failure has an address. Log the output of every step, and debugging becomes “read the state,” not “re-run and pray.”
Production Considerations
A few things that matter once a pipeline carries real traffic:
Persist state between steps. For long pipelines, use LangGraph’s checkpointing so a run can resume from where it failed instead of restarting from the top. Re-running an expensive 6-step pipeline because step 5 timed out is painful and avoidable.
Watch the latency add up. In a sequential pipeline, total latency is the sum of every step. Five steps at two seconds each is a ten-second wait. Parallelize independent steps (section 13), and keep each step’s prompt lean.
Mind the cost multiplier. Every step is at least one model call, and a retry or revise loop multiplies that. A pipeline with a validation loop can make 6–8 calls for one result. Budget for it, and use a small fast model for the simple steps (planning, validation) and save the bigger model for the step that needs it (writing).
Log every step’s input and output. This is non-negotiable for debugging a multi-step system. When something’s wrong, you want to read exactly what each step received and produced, not guess.
Set timeouts and caps everywhere. Per-step timeouts, a max on any revise loop, a ceiling on total steps. A pipeline that can hang or loop is a pipeline that will, eventually, at 3 a.m.
Make steps idempotent where you can. If a retry re-runs a step, it shouldn’t cause side effects twice (double-charging, duplicate records). Design steps so running them again is safe.
Complete Implementation
Everything in this article is in the companion GitHub repo as separate, runnable files:
sequential-workflows-langgraph/
├── README.md
├── requirements.txt
├── .env.example
└── src/
    ├── llm.py                          # central model setup (swap providers here)
    ├── schemas.py                      # Outline + QualityCheck (Pydantic)
    ├── 01_basic_sequential.py          # plain-Python chain
    ├── 02_multi_agent_sequential.py    # three focused agents
    ├── 03_langgraph_sequential.py      # the pipeline as a graph
    ├── 04_state_passing.py             # watch state flow  (no API key)
    ├── 05_real_world_pipeline.py       # structured outline -> draft -> SEO polish
    ├── 06_errors_retries.py            # retries + backoff  (no API key)
    ├── 07_validation_between_steps.py  # validation gate + revise loop  (no API key)
    ├── 08_parallel_vs_sequential.py    # fan-out/fan-in       (no API key)
    └── 09_evaluate_pipeline.py         # LLM-judge evaluation
Four examples (04, 06, 07, 08) run with no API key start there to see the mechanics instantly. The rest default to OpenAI and switch to Claude or any other provider with a one-line change in llm.py.
git clone https://github.com/<your-username>/sequential-workflows-langgraph.git
cd sequential-workflows-langgraph
pip install -r requirements.txt
python src/04_state_passing.py     # no key needed
cp .env.example .env               # add your key for the rest
python src/05_real_world_pipeline.py
Conclusion
- A sequential workflow runs steps in a fixed order, each step’s output feeding the next — the simplest, most reliable way to get complex work from agents.
- Breaking a big task into focused steps makes it more accurate, more debuggable, and more controllable than one giant prompt.
- State is the shared object that flows through the pipeline; each step returns only what it changed, and LangGraph merges it.
- Use structured output (Pydantic) for the handoffs between steps so you’re not parsing fragile text.
- Retries with backoff handle steps that crash; validation gates with a revise loop handle steps that produce bad output. Always cap the loop.
- Run independent steps in parallel (fan-out/fan-in with a reducer); keep dependent steps sequential.
- Sequential = fixed path, router = one branch chosen, supervisor = dynamic delegation. Pick the simplest that fits.
- Evaluate per-step and end-to-end, and log every step so failures have an address.
What’s Next in the Agentic AI Design Patterns Series
We’ve now built agents that use tools (Part 1), reason in a loop (Part 2), route to the right specialist (Part 3), and run step-by-step pipelines (Part 4). Each of these still starts from a blank slate on every run. The next pattern fixes that: memory giving agents the ability to remember across steps, across runs, and across sessions, so a pipeline can learn from what it did last time instead of starting fresh.
The code for this article is linked at the top clone it, run the no-key examples first, then wire in your own steps. That’s the fastest way to make this stick.
If you build a pipeline with this, tell me what steps you chained together. That’s where it gets interesting.
Found this useful? Follow along for the rest of the Agentic AI Design Patterns series and the code repo is linked at the top if you want to run it yourself.