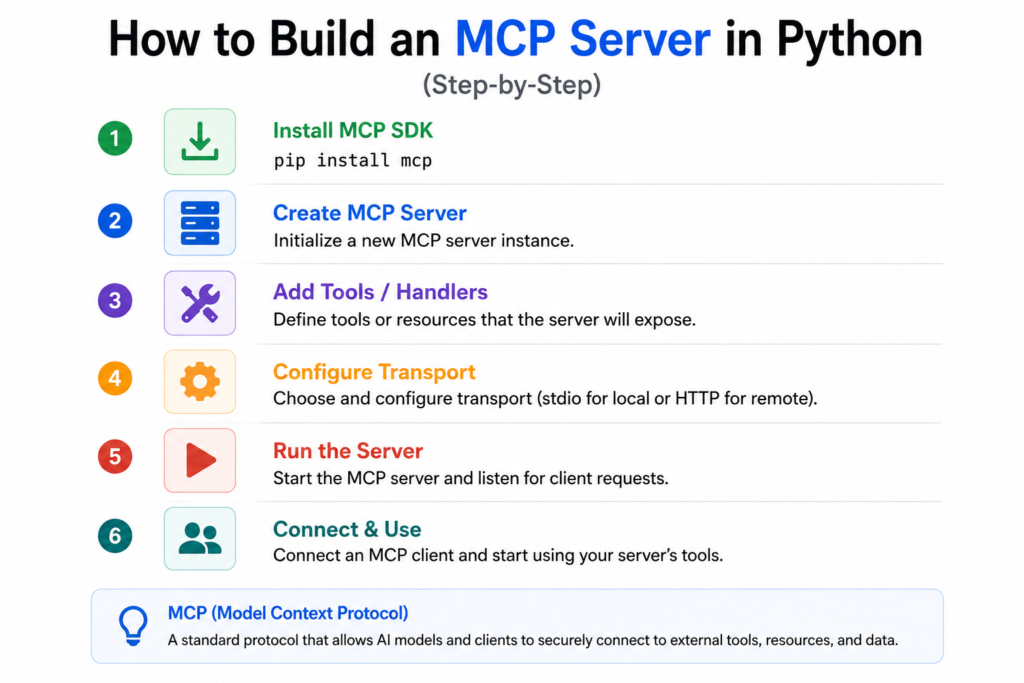
By the end of this tutorial, you’ll have a working MCP server written in Python — one that exposes a tool, a resource, and a prompt — running locally, verified with the MCP Inspector, and connected to Claude Desktop so you can actually ask Claude to use it. Every code block here was written, run, and checked for errors before being put in this article, so you can copy-paste with confidence.
If you’re not yet clear on what Tools, Resources, and Prompts actually are conceptually, read MCP Primitive Explained first, this tutorial assumes you already know the difference and just want to build.
What You’ll Learn
- How to set up a Python project for MCP development
- How to define a tool using FastMCP’s decorator syntax
- How to expose a resource and a prompt template
- How to run your server and inspect it with the official MCP Inspector
- How to connect your server to Claude Desktop and use it in a real conversation
- How to fix the five errors almost every beginner hits
Prerequisites
Before starting, make sure you have:
- Python 3.10 or later. Check with
python3 --version. The official MCP Python SDK requires 3.10+; this tutorial was built and tested on 3.12. - pip, which ships with Python by default.
- Basic Python knowledge — functions, type hints, and decorators. You don’t need any prior async or networking experience.
- Claude Desktop (optional, but recommended) if you want to complete the final step and actually talk to your server. Download it from claude.ai if you haven’t already.
- Node.js (optional) — only needed if you want to run the MCP Inspector locally via
npx, which we’ll use in Step 5. Most systems already have this if you’ve used any JavaScript tooling before.
What Is FastMCP?
The Model Context Protocol has a Python SDK. You can install it with pip install mcp. This SDK has two ways to build an MCP server. One way is the low-level Server class. With this class you have to write handler functions for list_tools, call_tool and so on. You also have to define your JSON Schemas by hand. The other way is FastMCP. This is a level decorator-based API. It is part of the SDK (mcp.server.fastmcp.FastMCP).
FastMCP is the part of MCP that was inspired by Flask. With Flask you can write a function. Add a decorator and you are done. FastMCP is similar. Of writing JSON Schema for every parameter, by hand FastMCP reads your functions type hints and docstring. Then it generates the schema automatically. With the low-level Server class a tool might need 20-30 lines of code. With FastMCP it only needs 4 lines.
# Low-level Server class (manual, verbose) — for reference only, not used in this tutorial
# You'd write a list_tools() handler returning a JSON Schema by hand,
# then a separate call_tool() handler that dispatches based on tool name.

# FastMCP (what we're using)
@mcp.tool()
def add(a: int, b: int) -> int:
    """Add two numbers"""
    return a + b
FastMCP is what other MCP Python tutorials use, so what you learn here will work with them too. There is another package that you can get from PyPI. This package is more advanced. Is made for people who want to use FastMCP for real projects. It has things like auth and versioning.. You do not need this package for this tutorial. We are using the FastMCP that comes with the mcp package. This is because it is stable and the people who make it are still working on it. It has everything we need for tools and resources and prompts. We like the FastMCP that comes with the mcp package because it is simple and easy to use. FastMCP is a choice, for this tutorial.
Project Setup
Create a new folder and a virtual environment so this project’s dependencies don’t collide with anything else on your machine.
mkdir mcp-weather-server
cd mcp-weather-server
python3 -m venv venv
Activate the virtual environment. The command differs by OS:
# macOS / Linux
source venv/bin/activate

# Windows (PowerShell)
venv\Scripts\Activate.ps1
Your terminal prompt should now show (venv) at the start of the line. Now install the MCP SDK with the CLI extras, which give you the mcp dev and mcp run commands we’ll use later:
!pip install "mcp[cli]"This tutorial was built against mcp==1.28.0. If you want to pin the exact version we tested, use:
!pip install "mcp[cli]"==1.28.0Your folder structure at this point should look like:
mcp-weather-server/
├── venv/
└── server.py        # we'll create this next
Step 1: Create Your First Tool
Create server.py and start with a single tool. We’re building a small weather server — it won’t call a real weather API (so the tutorial doesn’t depend on an external key), but the structure is identical to one that would.
from mcp.server.fastmcp import FastMCP

# Create the MCP server instance. The name shows up in client UIs.
mcp = FastMCP("WeatherDemo")

# In-memory "database" of city weather, just so the demo has no external deps
WEATHER_DB = {
    "delhi": {"condition": "Hazy", "temp_c": 34},
    "mumbai": {"condition": "Humid", "temp_c": 31},
    "bengaluru": {"condition": "Pleasant", "temp_c": 24},
}


@mcp.tool()
def get_weather(city: str) -> dict:
    """Get the current weather condition and temperature (Celsius) for a given city."""
    key = city.strip().lower()
    if key not in WEATHER_DB:
        return {"error": f"No weather data for '{city}'. Try delhi, mumbai, or bengaluru."}
    data = WEATHER_DB[key]
    return {"city": city, "condition": data["condition"], "temp_c": data["temp_c"]}


if __name__ == "__main__":
    mcp.run()
There are three things that are doing all the work here. The @mcp.tool() decorator is what registers the function as a tool, the type hint city: str becomes the tool’s input schema, and the docstring becomes the tools description. This is the text that the model sees when it is deciding whether to call this tool. You should write that docstring like you are explaining the tool to a teammate not like you are writing an internal code comment. The model uses it in the way that a human would use it. You are writing the docstring for the tool so write it like you are talking to someone, about the tool.
Step 2: Add a Resource
Now we are going to show some information that we cannot change. The Resources are just going to be they do not do anything on their own they are just something that a client can use. We need to add this to the same server.py file below the tool section.
@mcp.resource("weather://cities")
def list_cities() -> str:
    """Expose the list of supported cities as a read-only resource."""
    return ", ".join(sorted(WEATHER_DB.keys()))


@mcp.resource("weather://about")
def about() -> str:
    """Static info about this server, exposed as a resource."""
    return (
        "WeatherDemo MCP Server\n"
        "This demo server is part of the Nomidl MCP tutorial series.\n"
        "It exposes one tool (get_weather), one resource (city list), and one prompt (weather-report)."
    )
The thing that gets passed to @mcp.resource() is "weather://cities". This is the address that the resource uses. MCP does not care what kind of address you use. You can make up your own like weather:// or db:// or file://. The only thing that matters is that it is an address and it is the only one like it on your server. When you ask for something, from a resource it gives you information, like a string. The resource does not do anything it just gives you the information you ask for. The resource gives you the information and that is it there is no decision made. MCP just gives you the information when you ask for it and that is what the @mcp.resource() does with the “weather://cities” string.
Step 3: Add a Prompt Template
Finally, add a prompt a reusable template a user can select to trigger a specific, well-structured interaction:
@mcp.prompt()
def weather_report(city: str, tone: str = "casual") -> str:
    """Generate a prompt asking for a styled weather report for a city."""
    tones = {
        "casual": "Write a short, casual weather update",
        "formal": "Write a formal weather bulletin",
        "dramatic": "Write an overly dramatic, movie-trailer style weather report",
    }
    instruction = tones.get(tone, tones["casual"])
    return f"{instruction} for {city}, using the get_weather tool to fetch real data first."
Notice the tone: str = "casual" parameter has a default value — that makes it optional. A user invoking this prompt can either specify a tone or let it fall back to “casual.” When the prompt is selected, FastMCP returns the rendered string as a message the model treats exactly as if the user had typed it.
Your complete server.py should now have one tool, two resources, and one prompt, with mcp.run() at the bottom. If you want to sanity-check the file before moving on, this is what the full thing should look like:
from mcp.server.fastmcp import FastMCP

mcp = FastMCP("WeatherDemo")

WEATHER_DB = {
    "delhi": {"condition": "Hazy", "temp_c": 34},
    "mumbai": {"condition": "Humid", "temp_c": 31},
    "bengaluru": {"condition": "Pleasant", "temp_c": 24},
}


@mcp.tool()
def get_weather(city: str) -> dict:
    """Get the current weather condition and temperature (Celsius) for a given city."""
    key = city.strip().lower()
    if key not in WEATHER_DB:
        return {"error": f"No weather data for '{city}'. Try delhi, mumbai, or bengaluru."}
    data = WEATHER_DB[key]
    return {"city": city, "condition": data["condition"], "temp_c": data["temp_c"]}


@mcp.resource("weather://cities")
def list_cities() -> str:
    """Expose the list of supported cities as a read-only resource."""
    return ", ".join(sorted(WEATHER_DB.keys()))


@mcp.resource("weather://about")
def about() -> str:
    """Static info about this server, exposed as a resource."""
    return (
        "WeatherDemo MCP Server\n"
        "This demo server is part of the Nomidl MCP tutorial series.\n"
        "It exposes one tool (get_weather), one resource (city list), and one prompt (weather-report)."
    )


@mcp.prompt()
def weather_report(city: str, tone: str = "casual") -> str:
    """Generate a prompt asking for a styled weather report for a city."""
    tones = {
        "casual": "Write a short, casual weather update",
        "formal": "Write a formal weather bulletin",
        "dramatic": "Write an overly dramatic, movie-trailer style weather report",
    }
    instruction = tones.get(tone, tones["casual"])
    return f"{instruction} for {city}, using the get_weather tool to fetch real data first."


if __name__ == "__main__":
    mcp.run()
Step 4: Run the Server
With your virtual environment still active, run:
python server.pyYou will not see anything, on the screen. Your terminal will just stay there. This is the way it is supposed to be it is not frozen. When you use mcp.run it starts the server using the stdio transport by default. This means it is waiting for a client to connect using the input and output. Since there is no client connected yet there is nothing to show. You can stop it by pressing Ctrl+C. We will connect a client in the next two steps.
If you see the message ModuleNotFoundError: No module named 'mcp' it means your virtual environment is not turned on. You should go to the Common Errors section.
Step 5: Test With MCP Inspector
The MCP Inspector is a tool for checking MCP servers. It is, like a website where you can see and use your servers tools and resources. You can even try out prompts by yourself. You do not need Claude Desktop to use it. To start it follow these steps:
mcp dev server.pyThe first time you run this, it will download the Inspector package via npx (we tested with @modelcontextprotocol/inspector@0.22.0). Once it’s ready, you’ll see output similar to this:
⚙️ Proxy server listening on localhost:6277
🔑 Session token: 39b6eb92c5cdbd69a15b31799dd4ade8c2a9e4b18f70dba300539c....
   Use this token to authenticate requests or set DANGEROUSLY_OMIT_AUTH=true to disable auth
   http://localhost:6274/?MCP_PROXY_AUTH_TOKEN=39b6eb92c5cdbd69a15b31799dd4ade8c2a9976cba300539c.....
🌐 Opening browser...
The Inspector opens by itself at http://localhost:6274. The session token is already in the URL so you do not need to add it yourself. When the page loads
- You will see “Connected” in the status bar. This confirms that the Inspector launched your
server.pysuccessfully and finished the MCP handshake - Next click the Tools tab. You will see get_weather listed there. It will also show the description and the city parameter. Your docstring and type hint were used to generate these Entera a city for example: Delhi. Click on Tool you will get a JSON object with the condition and temperature.
- Now click the Resources tab. You will see
weather://citiesandweather://aboutlisted. Click either one to read its content directly. - Click the Prompts tab. You should see
weather_reportwith itscityandtonearguments. Fill them in and click to see the rendered prompt text.
If any of these tabs come up empty, double-check that the relevant decorator (@mcp.tool(), @mcp.resource(), @mcp.prompt()) is directly above the function definition with no blank line breaking the association, and that you saved the file before restarting mcp dev.
Leave this running in one terminal tab — you’ll use it again to confirm your server still works after the Claude Desktop setup in the next step. Stop it any time with Ctrl+C.
Step 6: Connect to Claude Desktop
Now let’s wire this server into Claude Desktop so you can actually talk to it. Claude Desktop reads its server list from a config file, claude_desktop_config.json, located at:
- macOS:
~/Library/Application Support/Claude/claude_desktop_config.json - Windows:
%APPDATA%\Claude\claude_desktop_config.json - Linux:
~/.config/Claude/claude_desktop_config.json
If the file doesn’t exist yet, create it. The fastest way on macOS is via Claude Desktop itself: Settings → Developer → Edit Config, which opens (and creates, if missing) the file in your default editor.
You need the absolute path to two things: your virtual environment’s Python interpreter, and your server.py file. Get the Python path with:
# macOS / Linux, with venv activated
which python

# Windows (PowerShell), with venv activated
(Get-Command python).Path
This should return something like /Users/yourname/mcp-weather-server/venv/bin/python on macOS/Linux, or C:\Users\yourname\mcp-weather-server\venv\Scripts\python.exe on Windows. Now add an entry to claude_desktop_config.json:
{
  "mcpServers": {
    "weather-demo": {
      "command": "/Users/yourname/mcp-weather-server/venv/bin/python",
      "args": ["/Users/yourname/mcp-weather-server/server.py"]
    }
  }
}
You need to replace both paths with the ones from your computer. Do not use cuts like relative paths or the ~ symbol because they do not work well here. This is because Claude Desktop starts the process without using the settings from your shell.
Using the path to the Python binary in your virtual environment instead of just typing "python" is a very important detail. This is actually the solution to the common problem that people have when they are trying to connect, which is talked about in the Common Errors section below.
Save the file. Then completely exit Claude Desktop, do not just close the window. On a Mac check the menu bar to make sure it has stopped and on Windows check the system tray. Then open Claude Desktop again. Once it is open start a conversation and look for a small hammer or tools icon near the box where you type messages. When you click on this icon you should see weather-demo with its tools and resources listed along, with a prompt.
Step 7: Test End-to-End
With Claude Desktop connected, type a message that should naturally trigger your tool:
“What’s the weather like in Mumbai right now?”
Claude should recognize that it has a get_weather tool available, ask for your permission to call it (Claude Desktop confirms before running most tool calls), and respond with the condition and temperature your server returned — “Humid” and 31°C, pulled straight from your WEATHER_DB dictionary, not from Claude’s training data.
You can also test the prompt by typing / in the message box — Claude Desktop should show weather_report as a selectable slash command. Choosing it and filling in city and tone will insert the fully-rendered prompt text into your message, ready to send.
If Claude responds without using the tool, or the hammer icon doesn’t show your server at all, restart Claude Desktop once more and check the Common Errors section — nearly every “it’s not connecting” issue traces back to a path or JSON syntax problem in the config file.
Conclusion
You have now built a MCP server from scratch. This is a deal. You tested the MCP server with the MCP Inspector. You also connected it to Claude Desktop. The MCP server can now be used with any MCP- client, not just Claude. This means the MCP server can share tools and resources and prompts, with clients. You can replace the demo weather data with an API. You can also add tools to the MCP server. The MCP server can do a lot of things now that it is built and working with the MCP Inspector and Claude Desktop.
Popular Posts
- MCP Primitives Explained: Tools, Resources, and Prompts With Real Examples
- How to Build an MCP Server in Python (Step-by-Step)
- How to Evaluate Your AI Agent: Metrics, Tools, and Frameworks That Actually Work
- The 6 Security Dangers of Autonomous AI Agents: Why Every Developer Needs to Understand Them Now
- Build an AI Agent with Real Memory Using Mem0, LangChain, and Groq